Adding an Audio File to a WYSIWYG Course
You can add audio files to Courses written using the LearnCenter WYSIWYG Course Editor. These files appear as audio players on the Course page. Typically, you will add files that you previously uploaded to Resource Manager. If there are files you want to use and you have not already uploaded them to Resource Manager, you can do so while adding them to your Course.
In the WYSIWYG Course Editor:
- Place your cursor at the spot on the page where you want the file inserted.
- Click
 .
.
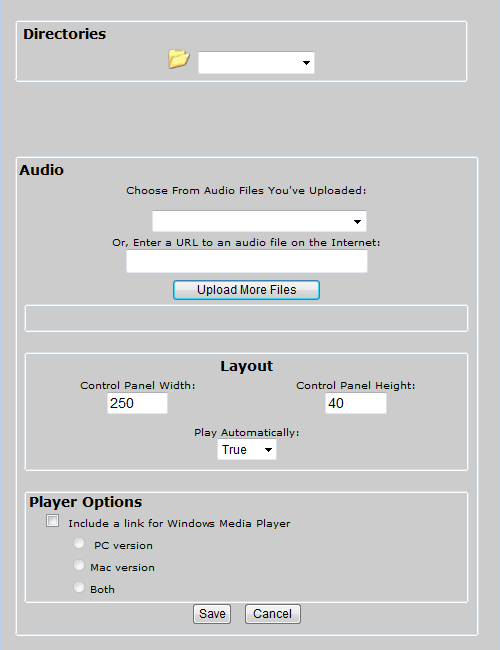
- Select Audio from the Directories drop-down list.
- Select the audio file you want.
- Type the Control Panel Width in pixels. (Default is 250)
- Type the Control Panel Height. (Default is 40)
- Select one of the following from the Play Automatically drop-down list:
- True - the audio file plays automatically when the user opens the page. (Default)
- False - the audio file does not play automatically when the user opens the page.
- Click the Include a Link for Windows Media Player check box to attach a link for users to download Windows Media Player.
or
Clear the check box if you do not want to include a link for users to download Windows Media Player.
- If you clicked the Include a Link to Windows Media Player check box, select one of the following:
- PC version - includes a link to download just the Microsoft® Windows® version of Windows Media Player.
- Mac version - includes a link to download just the Mac® version of Windows Media Player.
- Both - includes links to download both the Microsoft® Windows® and Mac® versions of Windows Media Player.
- Click Save. The audio file is added to the editor page at the insertion point.
- Click
 to preview the page and see how it will look to Users.
Uploading Audio Files
If you have not already uploaded the file you want to the Resource Manager, you do not need to navigate away from this window to do so. You can upload additional audio files the Resource Manager directly from this window. In the WYSIWYG Course Editor:
- Place your cursor at the spot in the editor where you want the audio player inserted.
- Click .
- Click Upload More Files.
- In the Directory to upload to drop-down list, select Audio.
- Click Browse and browse to the location on your computer or network drive for the audio file you want to upload.
- Select the file and click Open.
- Repeat the previous two steps until you have added each audio file you want to upload. (You can upload 10 files at once.)
- Click Upload. The files are uploaded and you receive a message indicating whether the upload was successful.
- Click Return. The uploaded files are listed in the Choose from Audio Files You’ve Uploaded drop-down list. To add one of the uploaded audio files now, select it from the list then click Save.
 Related Topics

Copyright © 2010-2015, Oracle and/or its affiliates. All rights reserved.